
8 Hearing Aid Cleaner Options Compared
A conservative starting point is a soft brush and dry microfiber cloth, plus the exact wax, vent or tubing tool approved for your model's routine care.
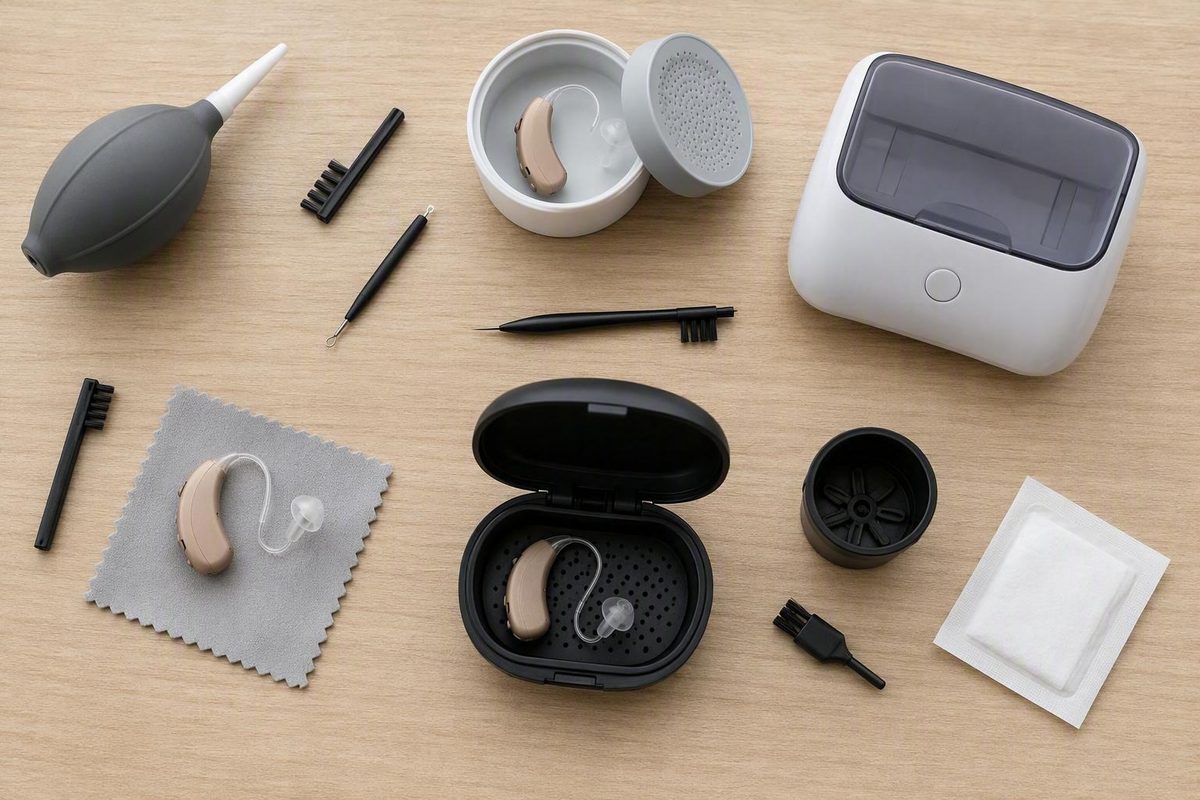
A “hearing aid cleaner” may be a brush, wax-removal tool, wipe, drying container, powered dryer, or automated machine. These products perform different jobs, and the available evidence does not establish one universally best choice.
The safest purchase starts with four questions:
- Which hearing-aid style do you have?
- Which component needs attention?
- Is the job surface cleaning, wax removal, tube clearing, moisture control, or part replacement?
- Does the device manual approve the proposed method?
That last question is decisive. Generic instructions cannot account for every coating, receiver design, rechargeable battery, dome, filter, or earmold. If your manual or hearing-care provider conflicts with general advice, follow the model-specific instructions.
Start With the Job: Cleaning, Wax Removal, and Drying Are Different
The market uses “hearing aid cleaner” as an umbrella term for products that perform distinct functions:
- Soft brushes and microfiber cloths remove dry surface debris, skin oils, and loose wax.
- Wax loops or picks remove material from designated recesses or vents—not from delicate microphone or receiver openings.
- Vent and tubing tools clear specific open passages.
- Approved wipes or sprays clean selected exterior surfaces when the manufacturer permits them.
- Passive dehumidifiers use a drying agent to manage moisture without electricity.
- Powered dryers may use moving air, controlled heat, or additional features such as UV.
- Automated cleaning systems may combine a liquid cartridge, mechanical cleaning, and drying.
- Replacement supplies include wax guards, domes, filters, desiccants, and solution cartridges.
A dryer does not necessarily remove wax. A brush that removes loose wax does not manage internal moisture. A wipe may clean the shell while doing nothing for a blocked filter. Start with the problem rather than the longest feature list.
Cleaning is not always the correct response
Some apparent cleaning jobs are replacement jobs. A wax guard that remains clogged after permitted brushing usually needs the specified replacement filter. A dome that is worn, misshapen, loose, or persistently obstructed may also need replacement.
Philips, for example, tells users of its covered RITE devices to replace clogged filters with the same filter type and to replace wax-filled domes rather than clean them. Those instructions apply to the described Philips products and must not be generalized to every brand or model. See Philips’ style-specific instructions.
An earwax-softening spray is different again: it is an ear-care product, not a cleaner for the hearing aid itself. Do not apply it to the device.
Be cautious with “disinfecting,” “sanitizing,” and UV claims
Some dryers and automated systems are marketed with UV or disinfection features. Those labels do not by themselves establish sterilization, a standardized level of microbial reduction, or clinically meaningful infection prevention. The supplied retailer descriptions do not provide sufficient independent testing to compare microbial performance across products.
Treat UV as a feature to investigate, not proof that a machine is a sterilizer. Before relying on a microbial-reduction claim, look for a named test standard, quantified exposure, tested organisms, material-compatibility information, and results for the complete operating cycle—not merely the presence of a UV bulb.
Use this decision path:
Identify the hearing aid → identify the component → identify the job → check the manual → choose the least complicated approved tool.
Identify Your Hearing Aid and Its Moisture-Sensitive Parts
Cleaning instructions differ because hearing aids place their electronics in different locations:
- BTE, or behind-the-ear: The main electronic body sits behind the ear. Sound travels through tubing to an earmold or dome. Some tubes and electronics-free earmolds are detachable.
- RIC, or receiver-in-canal: The main body sits behind the ear, but a thin wire connects it to an electronic receiver in the ear canal.
- RITE, or receiver-in-the-ear: Functionally similar to RIC; the receiver or speaker is in the earpiece rather than the behind-the-ear body.
- ITE, or in-the-ear: The electronics are housed in a custom shell in the outer ear.
- ITC, or in-the-canal: A smaller custom device that sits partly within the ear canal.
- CIC, or completely-in-canal: A small custom device positioned more deeply in the canal.
Components may include:
- Outer shell or casing
- Microphone openings
- Receiver or speaker outlet
- Wax guard or filter
- Dome
- Vent
- Thin acoustic tube
- Detachable earmold
- Battery door and compartment
- Charging contacts
- RIC or RITE receiver wire
The crucial distinction is not simply “earmold versus hearing aid.” It is electronics-free component versus component containing electronics. A detachable BTE earmold attached to an acoustic tube may contain no electronics. A RIC or RITE earpiece contains an electronic receiver and cannot be handled in the same way.
Component compatibility matrix
This matrix is a conservative starting point, not permission to override the manual.
| Component | Usually appropriate at home | Avoid | Replace or seek help when |
|---|---|---|---|
| Outer shell | Brush approved areas; wipe with a clean, dry microfiber cloth | Immersion, running water, or unapproved cleaners | Cracked, sticky, discolored, or persistently contaminated |
| Microphone openings | Brush lightly with openings facing downward | Inserting picks, wires, or other objects | Debris is embedded or sound remains muffled |
| Receiver or speaker outlet | Brush around the outlet only as directed; inspect the filter or dome | Pushing a tool into the speaker port | Blockage remains or the outlet appears damaged |
| Wax guard | Brush its exposed surface if permitted; replace with the specified type | Puncturing or digging through it | It remains clogged or sound is reduced or unusual |
| Dome | Inspect and follow model-specific instructions | Forcing tools through the speaker opening | Worn, loose, misshapen, or persistently blocked |
| Open vent | Pass the designated vent tool through only when clearly identified | Forcing the tool when it will not pass easily | The passage cannot be cleared safely |
| Detachable BTE thin tube | Use the specified tubing wire if user removal is permitted | Treating it like a RIC receiver wire | Cracked, stiff, discolored, kinked, or still blocked |
| Electronics-free BTE earmold | Brush or wipe; wash only when explicitly approved | Reconnecting while damp | Cracked, poorly fitting, or impossible to clear |
| RIC/RITE earpiece and wire | Dry exterior wiping and approved brushing | Washing, soaking, pulling, kinking, or probing the speaker | Wire is split, bent, loose, or damaged |
| Battery compartment | Dry brushing when permitted; leave open during drying if instructed | Applying liquid inside | Corrosion or unreliable operation |
| Charging contacts | Inspect and keep visibly clean and dry | Spraying or dripping cleaner onto contacts | Corrosion or charging trouble continues |
Electronic bodies, receivers, RIC wires, microphone openings, battery areas, and charging components should generally remain dry unless the exact manufacturer permits another method. Sharp objects should not be inserted into microphone or receiver ports, and persistent muffled sound after surface cleaning warrants professional help. The National Council on Aging’s component guide summarizes these distinctions.
If you cannot identify a component—or cannot tell whether an earmold contains a receiver—stop. Ask the manufacturer, audiologist, or hearing-care provider to identify it before detaching, washing, or probing anything.
What Belongs in a Conservative Starter Cleaning Kit
A conservative starter kit contains:
- A soft hearing-aid brush
- A clean, dry microfiber cloth
- A model-appropriate wax loop or pick
- The correct vent cleaner or tubing wire, if the device has a user-serviceable vent or detachable tube
Soft brush
Use the brush for visible dry debris on the shell and in manufacturer-approved areas around microphone covers, battery compartments, domes, or earmolds. Work over a soft, stable surface so a dropped device is less likely to strike a hard counter or floor.
When brushing an opening, hold it downward and use light strokes that direct loosened material away from the device. Do not drive bristles into a microphone or speaker opening.
Dry microfiber cloth
A clean microfiber cloth removes surface debris, oils, and perspiration without introducing liquid. Reserve it for the hearing aids; a cloth carrying lotion, household cleaner, or polish is no longer a clean, dry cloth.
A cloth cannot clear a blocked vent, filter, tube, or receiver outlet. Those jobs require the correct component-specific procedure.
Wax loop or pick
Use a wax tool only in the recesses or passages identified in the model instructions. Do not insert it into microphone ports, receiver ports, charging contacts, or any opening you cannot confidently identify.
If wax appears embedded behind a filter or inside an inaccessible port, stop rather than applying more force.
Vent or tubing cleaner
A designated vent cleaner may pass through a clearly identified open vent when the manufacturer treats that vent as user-serviceable. If it does not pass easily, stop.
A tubing wire is a different implement. It is intended for compatible detachable BTE tubing and may need to pass completely through the detached tube. Never thread it through a RIC receiver assembly, an attached electronic component, or an unidentified passage.
Multitools and accessibility
Some compact products combine a brush, wax pick, tube or vent cleaner, battery-door opener, and battery magnet. HearUSA’s five-function tool was listed at $10.90 when the supplied retailer page was captured; price and availability can change, and the listing does not establish compatibility or superior performance. Review the HearUSA tool format and current listing.
An all-in-one handle may be easier to hold than several tiny implements, but convenience does not make every tool end appropriate for every component.
For limited vision, tremor, arthritis, or reduced hand dexterity:
- Work on a mat that contrasts with the hearing aid’s color.
- Use bright, even lighting.
- Place the device and parts in a shallow, stable tray.
- Consider a larger-handled brush or multitool.
- Ask a provider to demonstrate the process and identify the correct tool.
- Avoid delicate filter changes if you cannot clearly see or stabilize the part.
Household substitutions have only limited, device-specific support. In a TruHearing demonstration for an ITE device, a very soft-bristled toothbrush substitutes for a hearing-aid brush and an eyeglass cloth substitutes for a cleaning cloth. The same demonstration uses dedicated tools for the vent and filter; it does not make ordinary toothbrushes, pins, needles, or generic pipe cleaners universally safe. Watch the direct ITE cleaning demonstration.
A Daily, Weekly, and Periodic Maintenance Routine
Cleaning frequency depends on wax production, perspiration, humidity, wearing time, device design, and observed buildup. Treat this schedule as a flexible baseline rather than a fixed rule.
Daily baseline
- Wash your hands and dry them completely.
- Work over a soft, stable surface.
- Inspect the shell, dome or earmold, openings, tubing, and wire.
- Brush visible dry debris from areas approved for brushing.
- Hold openings downward while brushing.
- Wipe the exterior with a clean, dry microfiber cloth.
- Inspect the battery area or charging contacts for visible debris or moisture.
- Store or dry the device according to its instructions.
Morning and bedtime routines are not mutually exclusive. A bedtime wipe removes perspiration and surface residue accumulated during the day. If both steps suit the device, wipe it at night and inspect or brush it in the morning.
Weekly or as needed
Inspect the parts that commonly obstruct sound:
- Domes
- Wax guards
- Vents
- Detachable BTE tubing
- Earmolds
- Microphone covers
- Receiver outlets
- Battery compartments
- Charging contacts
Clear only components the manual identifies as user-serviceable. A vent that accepts a designated cleaner is not permission to place that cleaner in a microphone port. A removable acoustic tube is not equivalent to a RIC wire containing an electrical connection.
If a wax guard remains clogged or the aid sounds unusual, replace it with the exact approved filter type. Do not substitute a filter merely because it looks similar. Dome instructions vary: some domes may be handled or wiped as directed, while certain manufacturers instruct users to replace a wax-filled dome rather than clean it.
Battery and charging care
For a disposable-battery device, the manual may permit opening the battery compartment during overnight storage or drying. Remove the battery when the specified drying procedure requires it.
For a rechargeable device, inspect the charging contacts and keep them clean and dry. Do not apply liquid directly. If charging remains unreliable after approved removal of visible dry debris, seek model-specific support. TruHearing’s general care guidance addresses dry cleaning, battery compartments, charging contacts, and the need to follow the device manual. Review its maintenance guidance.
Periodic professional care
Do not impose a universal professional-cleaning interval. One provider guide suggests inspection every 6–12 months, with more frequent attention for significant wax buildup, but the right schedule varies by user, device, service plan, and provider.
A professional visit may be needed sooner for persistent sound problems, inaccessible wax, damaged components, or moisture exposure. Someone who produces little wax and has no recurring problems may receive different advice from their provider.
How to Clean BTE, RIC/RITE, and In-the-Ear Devices
Confirm the exact model before beginning. Turn the hearing aid off when its instructions call for that step.
BTE hearing aids
For the electronic body:
- Wipe the casing with a dry microfiber cloth.
- Hold the microphone openings downward.
- Brush lightly so debris falls away.
- Inspect the battery compartment or charging area.
- Keep the electronic body away from water.
For detachable tubing:
- Confirm that the tube is designed for user removal.
- Detach it exactly as instructed.
- Pass only the designated cleaning wire completely through it if the manual permits.
- Stop rather than forcing a wire through a blockage.
- Confirm that the tube is clear and dry before reconnection.
For a detachable electronics-free earmold:
- Separate it only when the instructions permit removal.
- Brush or wipe away surface debris.
- Wash it with mild soap and water only if the manufacturer explicitly approves that method.
- Rinse only as directed.
- Let the earmold and attached acoustic tubing dry completely before reconnecting them.
Never wash the behind-the-ear electronic body. Never assume an earpiece is electronics-free merely because it resembles a conventional earmold.
RIC and RITE hearing aids
The receiver sits in the ear and connects to the behind-the-ear body through a thin wire, making the earpiece an electronic assembly.
- Wipe the casing, receiver wire, and exterior earpiece with a dry cloth.
- Brush approved exterior areas lightly.
- Inspect the dome for wax, deformation, looseness, or damage.
- Inspect the wax guard.
- Brush the exposed guard only if the instructions permit it.
- Replace the guard with the specified type if it remains clogged.
- Replace the dome when its model-specific instructions call for replacement.
Do not wash or soak the receiver assembly. Do not push a pick, wire, or vent tool into the speaker port. Avoid pulling, sharply bending, or twisting the receiver wire.
Stop if the wire is damaged, the dome cannot be seated securely, wax appears embedded behind the filter, or normal sound does not return after approved maintenance.
ITE, ITC, and CIC hearing aids
These devices contain their electronics within the custom shell, so the entire hearing aid must be treated as an electronic assembly.
- Hold the relevant openings downward.
- Use a soft, dry brush on the shell and around approved microphone and receiver areas.
- Wipe the exterior with a clean, soft cloth.
- Identify the vent before using a vent cleaner.
- Pass the proper cleaner only through a clearly open, user-serviceable vent.
- Inspect the wax filter and replace it if permitted brushing does not restore an open surface or normal sound.
A multi-style maintenance demonstration shows why these procedures must remain separate: exterior wiping, brushing, filter replacement, detached BTE tube cleaning, and custom-device vent cleaning are different tasks rather than one universal technique. View the direct Fauquier ENT demonstration.
For every style, stop home cleaning when:
- You cannot identify a detachable part.
- Wax is embedded or inaccessible.
- A vent or tubing tool will not pass easily.
- The receiver wire is damaged.
- A component appears corroded.
- The aid remains muffled or unreliable after approved maintenance.
Water, Wipes, Sprays, and Other Cleaning Safety Rules
The conservative rule is simple: do not immerse an electronic hearing aid or place it under running water.
Water instructions appear contradictory only when unlike components are grouped together. A detached BTE earmold containing no electronics may be washable when its manufacturer approves. An ITE shell, RIC receiver, RIC wire, BTE electronic body, microphone, battery compartment, or charging contact is a different object and should generally remain dry.
Products to avoid
Unless the exact manufacturer instructions say otherwise, avoid:
- Rubbing alcohol
- Household cleaners
- Solvents
- Standard disinfecting wipes
- Baby wipes
- Soap applied directly to the electronic device
- Products intended for skin, eyeglasses, phones, or countertops
- Unapproved cleaning fluids
- Sharp improvised tools
“Alcohol-free” does not automatically mean “hearing-aid-safe.” Similarly, a mild soap solution or minimally damp cloth may be permitted for selected surfaces by one manufacturer but prohibited for another device.
For example, Philips permits specified alcohol-free wipes or a lint-free cloth with mild soap solution on selected surfaces of the described Philips models, while TruHearing’s ITE demonstration warns against water, alcohol, and chemical wipes on that device type. These instructions are model-specific, not blanket approval or prohibition for every hearing aid.
If the manufacturer permits a cleaning spray, apply it to a cloth rather than spraying the hearing aid directly. Use only the specified amount, keep moisture away from openings, and follow the stated drying procedure.
Heat and handling hazards
Do not use:
- A hair dryer
- A microwave
- An oven
- A radiator or other direct heat source
- Pins, needles, or knives
- Force against a blocked vent or tube
General hearing-aid care guidance warns against water, unapproved chemicals, microwaves, and hair dryers, and recommends removing devices before swimming, bathing, or showering. Miracle-Ear summarizes these cleaning and moisture precautions.
Prevention is easier than emergency drying
Remove hearing aids before showering, bathing, or swimming. Apply hair spray, styling spray, gel, and similar products before inserting the devices. If perspiration is a recurring problem, ask the manufacturer or provider about compatible moisture-management options.
Manual Kits vs. Dryers and Automated Cleaning Systems
Compare hearing aid cleaners by function, not by whether a seller calls them basic, premium, complete, sanitizing, or professional.
Editorial disclosure: Hear Review did not test these products hands-on or independently verify their performance. Prices, specifications, package contents, cycle claims, and warranties below come from the cited retailer or manufacturer pages. Commercial listings should be checked again before purchase. This sourcing approach is consistent with Hear Review’s editorial disclosure.
Price-check date for publication: August 14, 2026. Prices and availability remain subject to change.
| Function | Example format | Supplied-page price | Included features | Consumables and cycle | Compatibility questions | Evidence limitations |
|---|---|---|---|---|---|---|
| Clear compatible thin tubes | Universal wire sticks | $5.99 for 25 | Individual tube-cleaning wires | Disposable; no cycle | Is the tube detachable and approved for wire cleaning? | Retail listing; no comparative testing |
| Manual brushing and wax handling | Two 3-in-1 brushes | $7.99 per two-pack | Brush, wax loop, battery magnet | None stated | Are the loop and brush suitable for the exact ports? | Retail listing; no durability data |
| Manual maintenance | HearUSA five-function tool | $10.90 | Brush, wax pick, tube or vent cleaner, battery-door opener, battery magnet | None stated | Which functions are approved for the model? | Product-format example, not a recommendation |
| Cleaning and moisture management | Beltone cleaning set | $25 | Travel-bag set; supplied text did not enumerate every item | Drying supplies may require replacement | Is it intended for this brand and device? What is currently included? | Seller claims; package contents incompletely specified |
| Passive moisture management | Desiccant container | Varies | Container and replaceable or rechargeable drying agent | Desiccant requires periodic service | Must the battery be removed? Is the method approved for this rechargeable model? | Category-level comparison; does not remove wax |
| Powered moisture management | Electronic dryer | Selected listings began at $27.50 | May include a fan, controlled heat, or UV | Cycle and replacement parts vary | Temperature, dimensions, power, and battery compatibility | Category-level retailer data; no independent comparison |
| Automated liquid cleaning and drying | PerfectClean | $138 | Unit, initial cartridge, power supply, automatic shutoff | Retailer states a 60-minute cycle; initial cartridge 30 cycles, later refills 45 | Dimensions, materials, rechargeability, and approved liquid exposure | Retailer specifications; effectiveness and microbial performance not independently compared |
The first two rows came from the same retailer category page. That page also illustrates why category labels are unreliable: wipes, brushes, cleaning tablets, drying capsules, blowers, and refills appear together even though they perform different jobs.
Beltone’s listing refers specifically to Beltone hearing aids, and the supplied page did not enumerate every item in the set. Compatibility with another brand should not be assumed.
Evaluating an automated system
ADCO listed PerfectClean at $138 and described a 60-minute cycle with automatic shutoff, an initial cartridge stated to last 30 cycles, later cartridges stated to last 45 cycles, and a two-year manufacturer warranty. These are retailer specifications, not independent findings about cleaning effectiveness, reliability, material compatibility, or microbial reduction.
Using the retailer’s listed starting refill price of $14.75 and its claim of 45 cycles per refill:
$14.75 ÷ 45 ≈ $0.33
That is approximately $0.33 per cycle, before shipping, taxes, wasted solution, and the equipment purchase. It excludes wax guards, domes, filters, wipes, and other supplies the user may still need.
Do not convert broad seller statements into established outcomes. The supplied evidence does not independently show that this or another automated system cleans completely, works with every hearing system, prevents irritation, or sterilizes hearing aids.
Calculate the whole cost
Depending on the system, recurring expenses may include:
- Disposable wipes
- Cleaning tablets
- Drying capsules
- Desiccant packs or discs
- Solution cartridges
- Wax guards
- Domes
- Filters
- Replacement UV bulbs
- Shipping and taxes
Before buying a powered or automated system, verify:
- Internal dimensions and lid clearance
- Power and plug requirements
- Cycle duration
- Drying temperature or temperature range
- Compatibility with the exact rechargeable device and battery
- Whether removable batteries must be taken out
- Whether the hearing aid can remain in its charger
- Availability and shelf life of consumables
- Warranty terms
- Hygiene-item return restrictions
- Estimated annual use cost
A passive dehumidifier adds moisture control without power. A powered dryer may provide a timed or controlled process. An automated liquid system adds convenience and recurring cartridge costs. None of those differences proves superior long-term value.
The supplied sources do not independently compare debris removal, drying performance, microbial reduction, durability, failure rates, or total ownership cost under the same conditions.
Moisture Control and What to Do If a Hearing Aid Gets Wet
A dehumidifier or powered dryer addresses moisture, not every cleaning need.
- Passive dehumidifiers generally use replaceable or rechargeable desiccant and require no electricity.
- Powered dryers may use a fan, controlled heat, or UV.
- Combination systems may add solution-based cleaning or charging functions.
The right choice depends on climate, perspiration, exercise, wearing time, device style, and the manufacturer’s storage instructions. More expensive does not automatically mean more appropriate.
Rechargeable-aid users should verify the temperature profile and compatibility with the exact battery and hearing-aid design. Retailer listings include controlled-heat dryers, products marketed for rechargeable aids, desiccant refills, solution cartridges, and replacement bulbs, but those listings do not independently establish comparative effectiveness or safety. Browse the category-level dryer formats and listed prices.
UV remains a product feature, not proof that a dryer sterilizes a hearing aid or prevents infection.
Routine moisture management
At the end of the day:
- Wipe the exterior with a dry cloth.
- Check for visible moisture.
- Remove removable batteries and open the battery door when the instructions call for it.
- Place the device in its approved case, charger, passive container, or dryer.
- Follow the specified cycle and storage procedure.
- Replace or recharge the desiccant when required.
Do not improvise a drying temperature for a rechargeable aid.
If a hearing aid gets wet
For an accidental splash or water exposure:
- Remove the hearing aid from the water.
- Turn it off.
- Remove a removable battery when applicable.
- Open the battery compartment if the model permits.
- Wipe the exterior carefully with a dry cloth.
- Follow the approved air-drying or device-specific drying procedure.
- Do not apply direct heat.
Possible warning signs after moisture exposure include:
- Muffled or distorted sound
- Intermittent operation
- Volume fluctuations
- Unexpected shutdowns
- Visible moisture
- Rust or corrosion
These signs do not prove moisture is the only cause. A blocked filter, depleted battery, damaged receiver, charger problem, or internal fault may produce overlapping symptoms.
A drying container is not a substitute for inspection after submersion, substantial water exposure, visible corrosion, or continued malfunction. General provider guidance distinguishes passive desiccant dehumidifiers from powered units using fans, heat, or UV and recommends checking compatibility, particularly for rechargeable hearing aids. See the dehumidifier-versus-dryer explanation.
Troubleshooting and Knowing When to Stop Cleaning
Troubleshooting should begin with the simplest visible, user-serviceable cause and stop before invasive cleaning.
Reduced or muffled sound
Check only the components applicable to your device:
- Dome: Is its opening visibly obstructed? Is it misshapen or loose?
- Wax guard: Is its exposed surface clogged? Brush only if permitted; otherwise replace it with the correct type.
- Receiver outlet: Is debris visible around—not deep inside—the outlet?
- Microphone openings: Is dry debris covering them?
- Vent: Is a clearly identified open vent blocked?
- BTE tubing: Is detachable acoustic tubing obstructed, kinked, cracked, or wet?
- Battery or charge: Is the device adequately powered?
- Moisture history: Was it exposed to rain, heavy perspiration, or water?
Do not keep probing when these visible checks fail. Sound that remains muffled after approved cleaning requires professional assessment.
Clogged wax guard
Use this sequence:
- Confirm the guard type and location.
- Brush its exposed surface only if the manual permits.
- Replace it if it remains clogged or sound stays unusual.
- Use the same approved filter type.
- Seek help if the old filter cannot be removed cleanly or the new one will not seat correctly.
Do not puncture the guard or push wax through it toward the receiver.
Charging trouble
- Confirm that the charger has power.
- Inspect the hearing aid and charger contacts.
- Remove only visible dry debris using the approved method.
- Keep the contacts dry.
- Do not apply cleaner directly.
- Check whether the device seats correctly in the charger.
- Seek service if charging remains inconsistent.
Corrosion, damaged contacts, battery faults, and charger problems are not resolved by adding cleaning liquid.
Feedback or intermittent operation
Visible wax, an obstructed dome, or moisture may contribute to feedback or intermittent sound, but cleaning is not the only possible solution. Fit, tubing, receiver condition, internal components, programming, and other factors may need assessment.
Stop home maintenance and contact a hearing-care professional for:
- Inaccessible or embedded wax
- A vent or tube that cannot be cleared easily
- A damaged receiver wire
- Visible corrosion
- Submersion or substantial water exposure
- Persistent feedback
- Intermittent operation
- Repeated shutdowns
- Sound that remains muffled
- A filter, dome, or tube that cannot be fitted correctly
- Uncertainty about an electronic earpiece or detachable part
Professional service may include deeper cleaning, component inspection, performance testing, and model-specific adjustment. Scope and price vary by provider and may be included in some service plans.
Professional-maintenance timing should also be individualized. A 6–12 month inspection is a commonly cited provider example, not a universal requirement. Heavy wax, perspiration, recurring moisture exposure, or unexplained sound changes may justify earlier attention.
For most buyers, the sensible starting point is the least complicated model-approved set: a soft brush, dry microfiber cloth, and the correct wax, vent, or tubing implement. Add a passive or powered drying product only when moisture conditions and device compatibility justify it. Include consumables in the cost, treat water, wipe, heat, and UV claims cautiously, and consult the hearing-aid manufacturer, audiologist, or hearing-care provider when blockage, damage, or sound problems persist.
Frequently Asked Questions
What is the safest hearing aid cleaner for everyday use?
There is no universally safest product for every hearing aid. For routine care, the conservative starting point is usually a soft hearing-aid brush and clean, dry microfiber cloth, supplemented by the exact wax, vent, or tubing tool approved for the model.
Brush lightly with the relevant openings facing downward. Do not insert tools into microphone or receiver ports. Check the manual before using liquids, wipes, sprays, dehumidifiers, or powered dryers.
Can I use alcohol wipes, baby wipes, soap, or water on hearing aids?
Do not assume they are safe. Rubbing alcohol, household cleaners, baby wipes, standard disinfecting wipes, and unapproved solvents should generally be avoided.
Some manufacturers permit a specified alcohol-free hearing-aid wipe, minimally damp cloth, or mild soap solution on selected exterior surfaces. Other instructions prohibit chemical wipes or moisture on particular ITE or RIC devices. The exact manufacturer instructions must resolve that difference.
Never immerse the electronic hearing aid or place it under running water. Soap and water may be appropriate for a detached electronics-free BTE earmold only when explicitly approved.
Should I clean a blocked wax guard or replace it?
Follow the model’s instructions. Some wax guards may be brushed lightly on the exposed surface. If the guard remains clogged or sound is still reduced or unusual, replace it with the same approved filter type.
Do not puncture the guard or push a pick through it. If you cannot remove or seat the filter correctly, ask your hearing-care provider for help.
Can a detached hearing-aid earmold be washed?
Sometimes. A detachable BTE earmold without an electronic receiver may be washable with mild soap and water when the manufacturer permits it. The earmold and tubing must be completely dry before reconnection.
Do not wash a RIC or RITE earpiece containing an electronic receiver. If you cannot determine whether the earmold contains electronics, do not detach or wash it.
Do I need a hearing-aid dryer or dehumidifier?
Not everyone needs an expensive drying system. The decision depends on humidity, perspiration, lifestyle, moisture exposure, device design, and the manufacturer’s storage guidance.
A passive desiccant container may be adequate for routine moisture control. A powered dryer may offer a timed cycle, fan, or controlled heat, but its dimensions and temperature profile must be compatible with the hearing aid—especially a rechargeable model. Neither type replaces manual wax removal or professional inspection after substantial water exposure or continuing malfunction.